

A few weeks ago, we massively improved the performance of the dashboard & website by optimizing some of our SQL queries. In this post, we’ll share how we identified the queries that needed work. In the next post, we’ll explore how we fixed each of them.
We’ll cover the basics and gradually work our way up to the more advanced/complex ways of identifying slow queries.
In this post, you’ll see:
Let’s go!
What these results look like #
As a reminder, this is the resulting performance gain for the dashboard & some of our internal APIs:
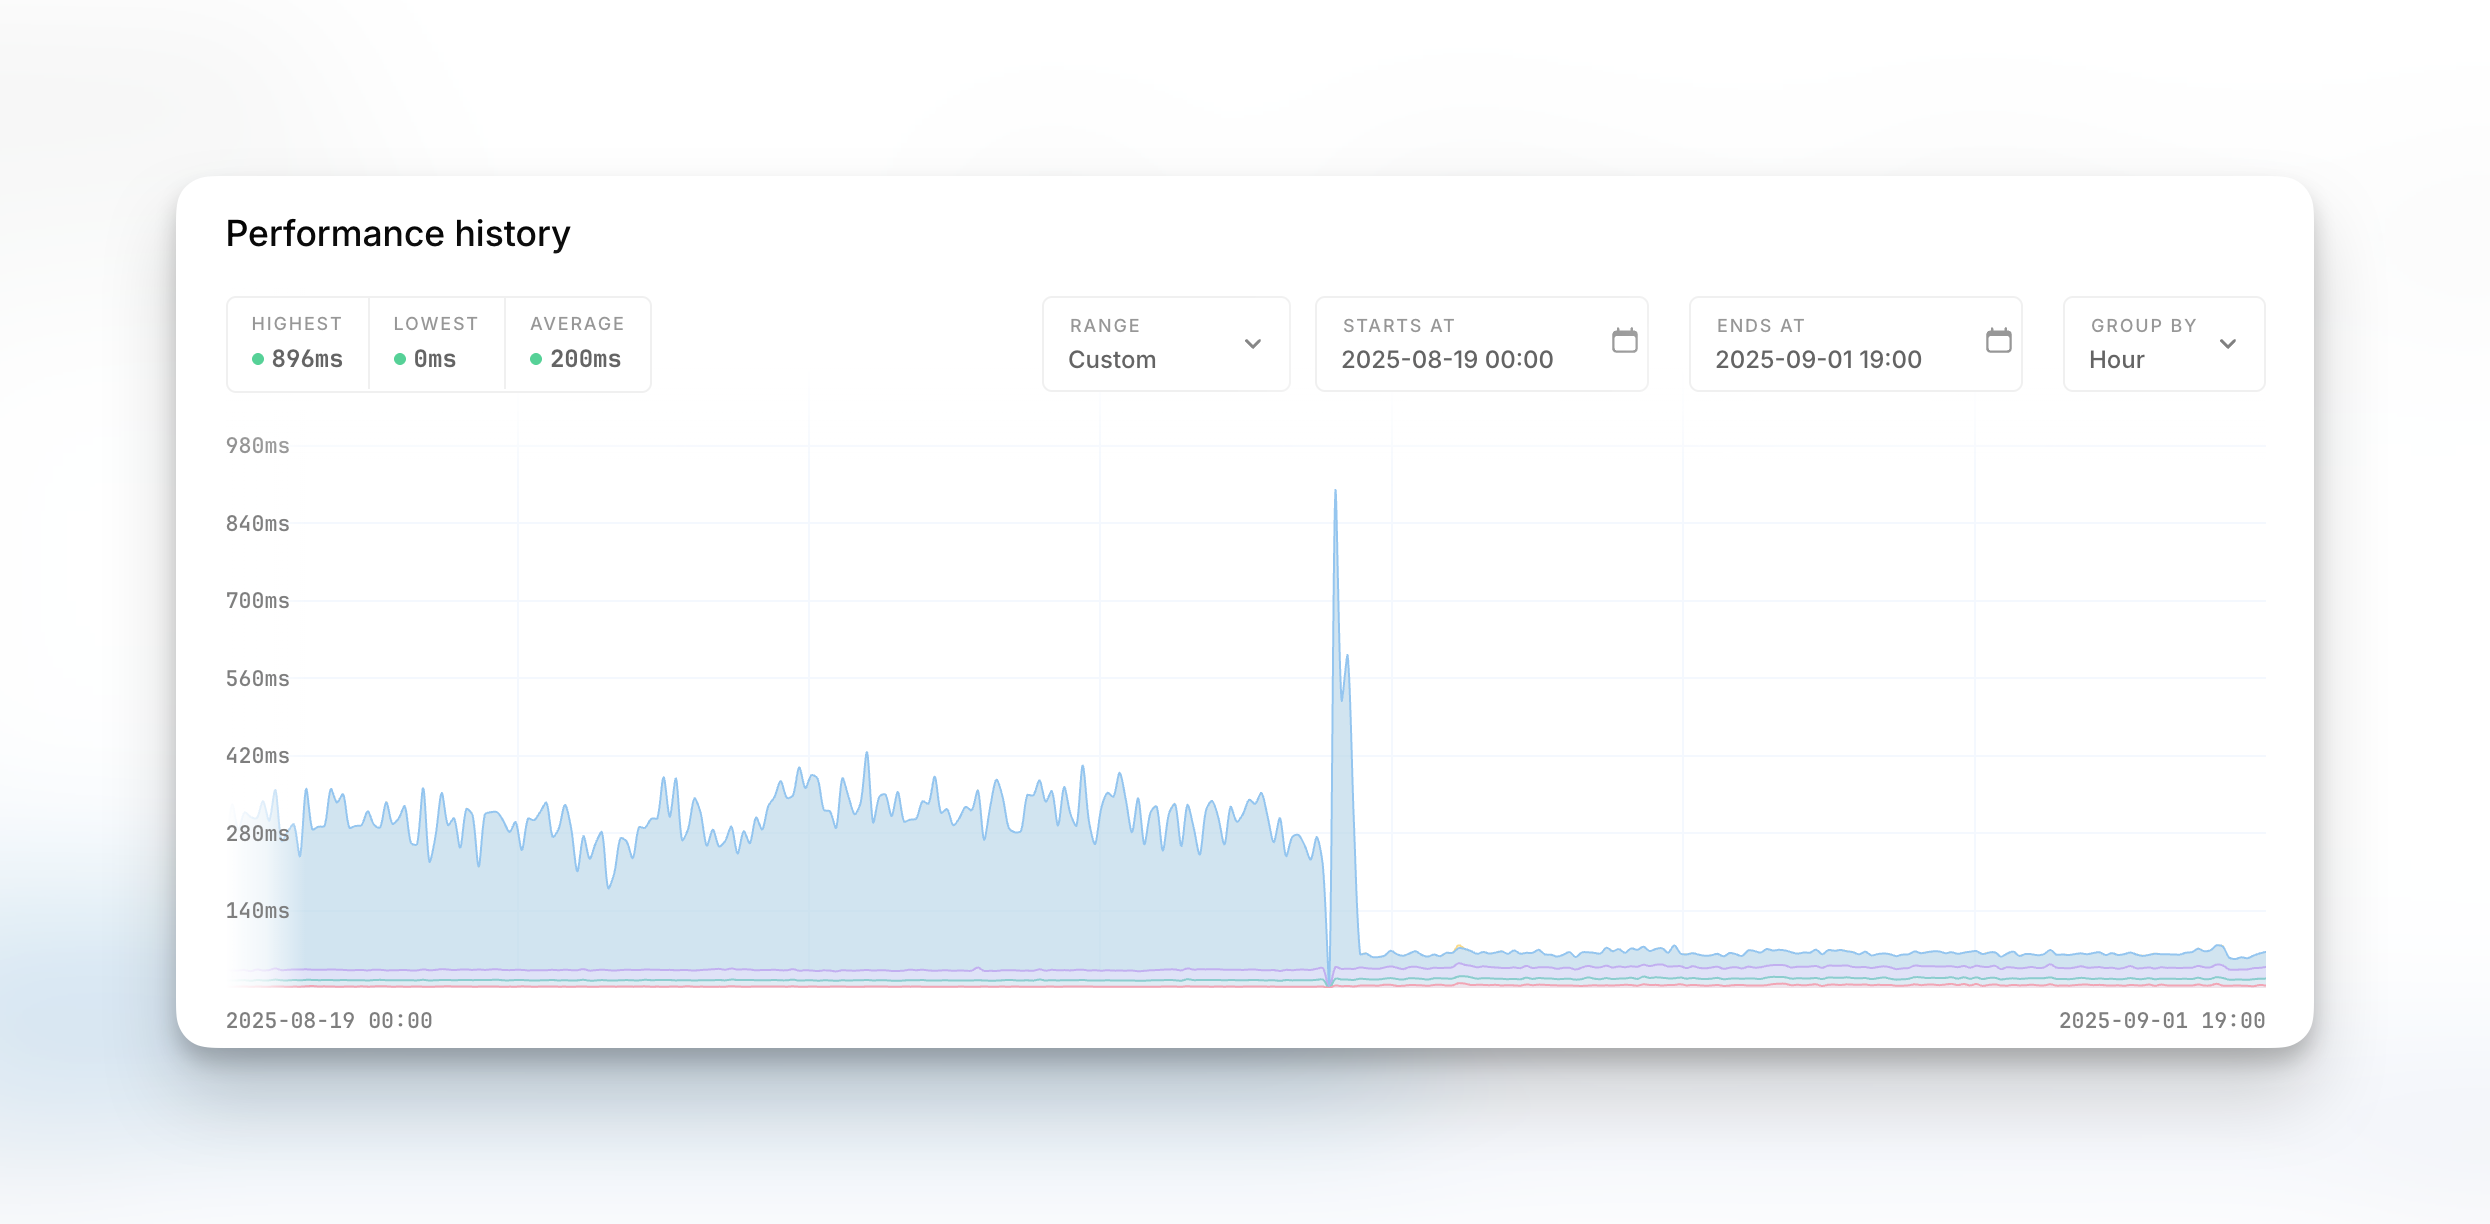
These graphs come from the Oh Dear uptime & performance monitoring we perform.
Now let’s get started identifying which queries need optimising.
Enable the debug-bar in your local environment #
The easiest place to start investigating queries is locally, in your development environment. Most frameworks have the concept of a “debug bar” – in the case of Laravel applications, the most widely used is the barryvdh/laravel-debugbar package that offers excellent insights.
Once enabled, you can see output similar to this:
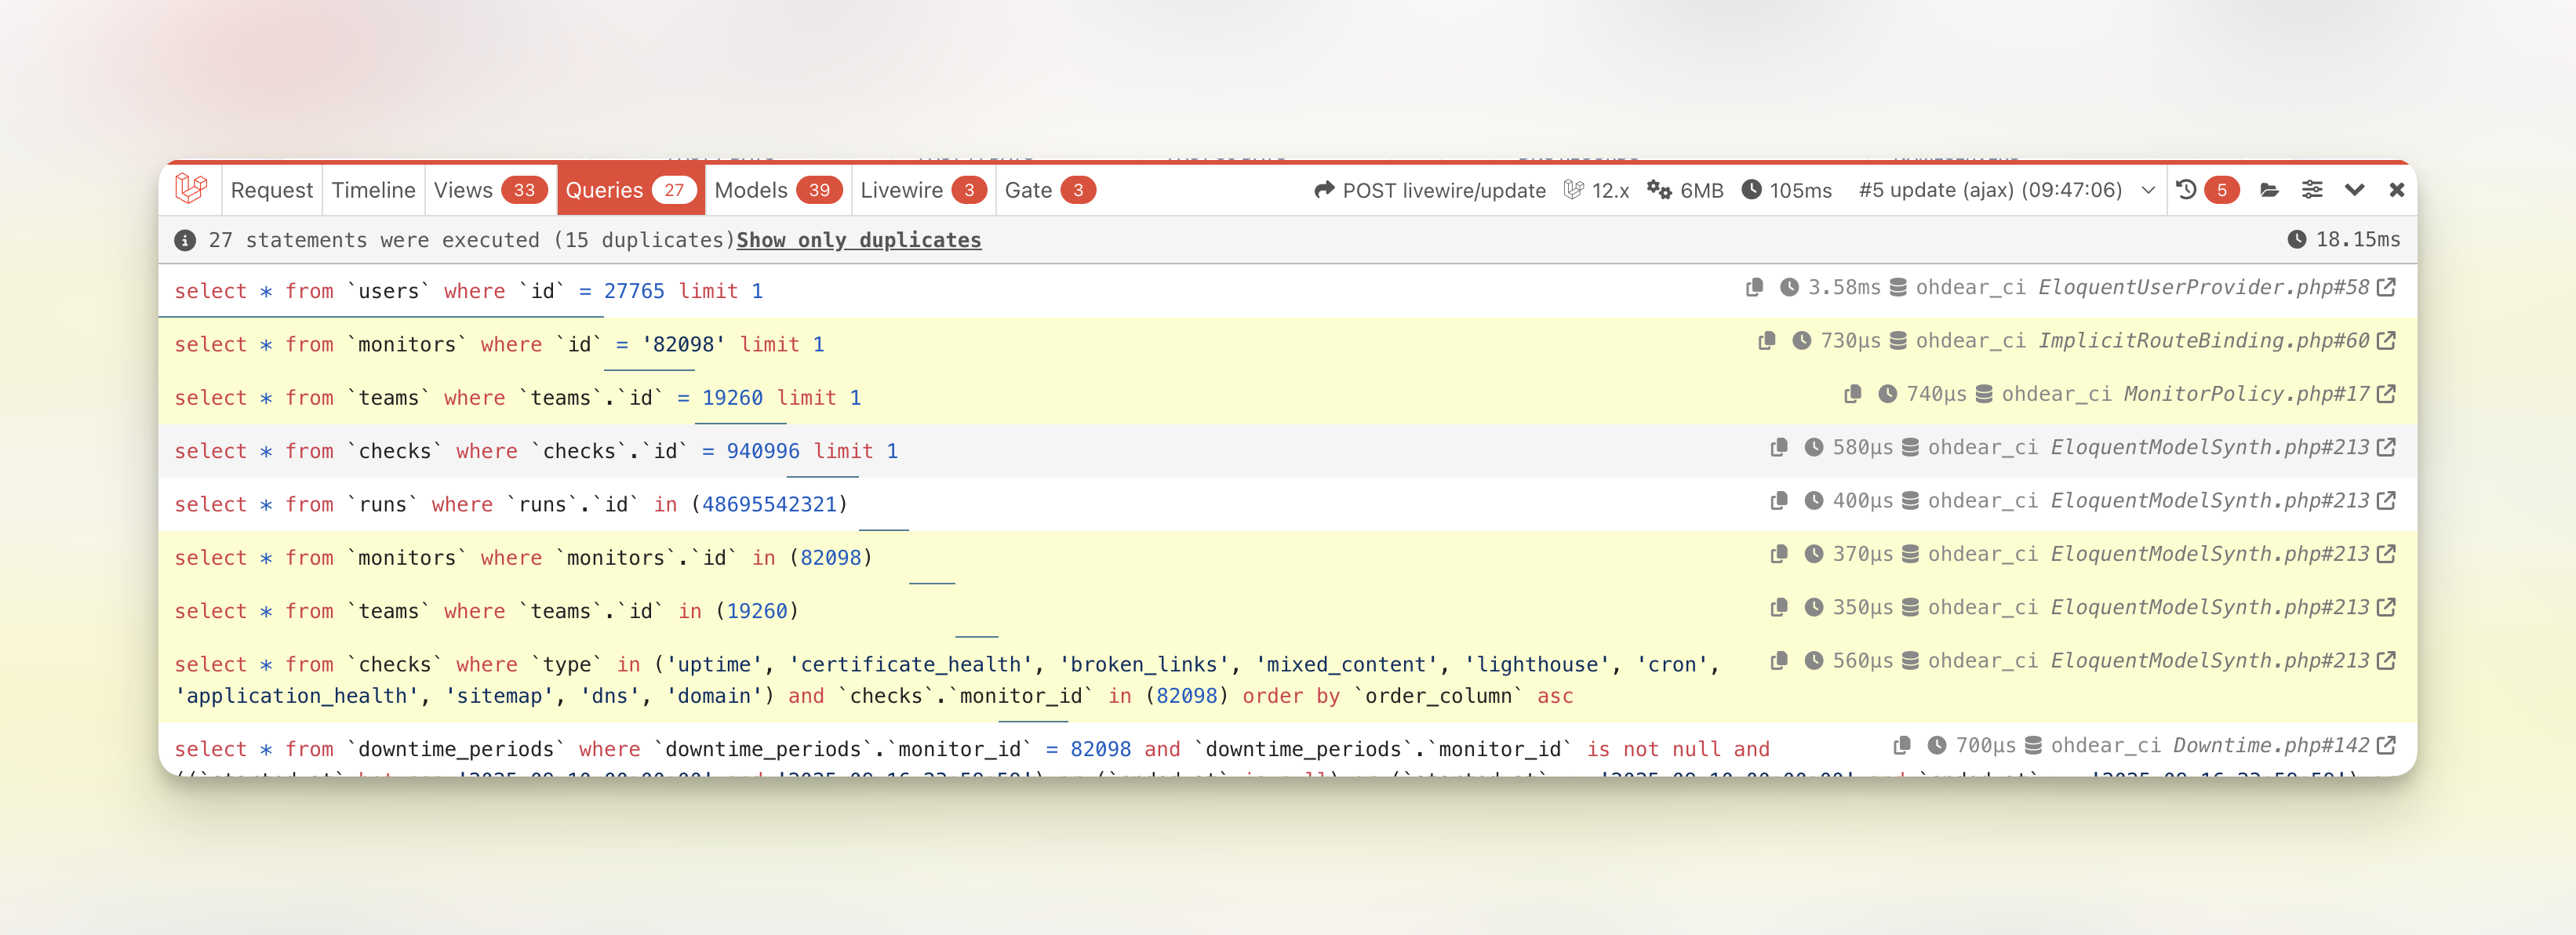
It contains, at a glance:
- The total time spent executing SQL queries (top-right)
- The total amount of queries executed (top-left)
- How many of those were duplicates (indicating potential N+1 loop issues)
Before optimising any query, it makes sense to ask the question: can the query be avoided in the first place? Duplicate queries are worth investigating, as well as queries that don’t add meaning to the page you’re seeing (ie a Class being lazy-loaded whose data isn’t needed on this page).
In our case, if we’re looking at the data being loaded on an uptime monitor, we wouldn’t expect a SQL query to load data for a broken link monitor. For this, you need application-awareness to know what data makes sense to load on that page.
Let MySQL tell you which queries are slow #
MySQL has the ability to enable a “slow query log”, where you get to decide what qualifies as a slow query. This is the easiest step to get started, as MySQL will log to disk the SQL queries that exceeded your threshold.
First, create the file to be used as the log (as the root user):
$ touch /var/log/mysql-slow-query.log
$ chown mysql:mysql /var/log/mysql-slow-query.log
This creates an empty file and allows MySQL to read & write to it. If the file doesn’t exist, MySQL won’t create it for you, it just won’t log anything.
Next, hop in your MySQL command-line and activate the Slow Query Log.
$ mysql
mysql> SET GLOBAL slow_query_log_file="/var/log/mysql-slow-query.log";
mysql> SET GLOBAL long_query_time = 1;
mysql> SET GLOBAL slow_query_log = 'ON';
From this point, MySQL will log every query that exceeded the 1s threshold in your log file. Tweak the “long query time” as you see fit.
$ tail -f /var/log/mysql-slow-query.log

# Query_time: 2.547717  Lock_time: 0.000003 Rows_sent: 0  Rows_examined: 0
SET timestamp=1757095277;
select * from `runs` where `runs`.`check_id` = ...;
This will give you a list of your slow queries, ready to be optimized.
The example above will modify your currently running MySQL instance to log queries, but if you restart your MySQL server, the settings won’t be persisted. If you want to have this enabled all the time, it needs to be added to your my.cnf config file:
[mysqld]
slow_query_log = ON
slow_query_log_file = /var/log/mysql-slow-query.log
long_query_time = 1
You can gradually increase the slow query threshold, MySQL allows decimal values to log queries that are faster than 500ms, 300ms, etc.
mysql> SET GLOBAL long_query_time = 0.3;
This would let MySQL log all queries that are slower than 300ms.
If the results become too verbose, you can tweak how many queries get logged a bit more by setting a minimal amount of rows that a query should return, before it’s logged.
mysql> SET GLOBAL min_examined_row_limit = 1000;
Queries that examine fewer than this number of rows will not be logged to the slow query log.
Let MySQL tell you which queries lack indexes #
Spoiler alert: a fast query usually has indexes on them that make retrieving the data blazing fast. We’ll explore how to set those & decide which ones to set in future posts.
MySQL can log all queries that are being executed that don’t use an index for lookups. This can get a little noisy, especially if you haven’t added indexes before, so this is a setting to enable once you’ve done the 2 tips shared above first, to trim down on the log-noise this might generate.
mysql> SET GLOBAL log_queries_not_using_indexes = ON;
This will log all sorts of queries, including queries like:
SELECT * FROM users: a full table scan (without aWHEREclause)SELECT * FROM users WHERE email="[email protected]": aWHEREclause on a non-index columnSELECT * FROM users WHERE UPPER(email) = '[email protected]: a function call on an indexed column (this prevents index usage)SELECT * FROM users WHERE name LIKE '%mattias%': using a leading wildcard in a LIKE statement
I wouldn’t recommend running log_queries_not_using_indexes all the time, just for debugging & analysis purposes.
The log_queries_not_using_indexes is also compatible with the same min_examined_row_limit option we shared in the previous tip, so you can limit the logging of non-indexed queries by adding:
mysql> SET GLOBAL min_examined_row_limit = 1000;
If you have a high amount of queries without indexes and a busy MySQL server, the log activity can also become a bottleneck. Keep this in mind and disable it again once you’re done with your analysis.
mysql> SET GLOBAL log_queries_not_using_indexes = OFF;
Ps; feels weird writing queries that set a value to what seems to be a string, right? The values for OFF and ON are reserved keywords, similar to TRUE or FALSE, so they don’t need quotes.
Let MySQL tell you which queries are executed right now #
As a rule of thumb, I like to use: whenever I can see a query being executed right now, it probably can use some optimisations.
Think about that logic for a second: ideally, queries are finished under 10ms or faster. What are the odds that when I request the current processlist, a query will show up? It becomes such a narrow window that when you look at the current processlist a few times, and you see the same queries showing up over and over again, they’re worth investigating.
Let’s start with the basics:
mysql> SHOW FULL PROCESSLIST;
If this returns a lot of results, you can use the raw SQL query to be able to filter the results based on your own criteria. The SHOW FULL PROCESSLIST is essentially a shortcut for the following SQL query:
mysql> SELECT
		ID,
		USER,
		HOST,
		DB,
		COMMAND,
		TIME,
		STATE,
		INFO
FROM performance_schema.processlist
ORDER BY ID;
So you’re able to trim down the output a little by avoiding Sleeping connections or from databases or users you don’t need (if you’re hosting multiple databases on this system);
mysql> SELECT
		ID,
		USER,
		HOST,
		DB,
		COMMAND,
		TIME,
		STATE,
		INFO
FROM performance_schema.processlist
WHERE DB = 'ohdear' AND COMMAND != 'Sleep';
If you run this command a few times in a row and you see the same types of queries showing up, even if they have indexes, they’re worth noting for followup.
The output of PROCESSLIST and the content of the performance_schema.processlist have a limitation that the TIME only has seconds granularity, so it’s hard to sort on. As a workaround, once you need more insights into < 1 second queries, you can run the following query:
mysql> SELECT
	t.processlist_id,
	t.processlist_user,
	t.processlist_host,
	t.processlist_db,
	t.processlist_command,
	t.processlist_state,
	t.processlist_info,
	ROUND(s.timer_wait/1000000, 2) as execution_time_ms
FROM performance_schema.threads t
JOIN performance_schema.events_statements_current s ON t.thread_id = s.thread_id
WHERE t.processlist_command != 'Sleep'
  AND s.timer_wait IS NOT NULL
ORDER BY s.timer_wait DESC;
This will show the time spent in miliseconds in the execution_time_ms column.
Let MySQL tell you which queries get executed the most #
Caution: on high-traffic MySQL servers, this will become a major bottleneck! Be careful.
This one is best to enable locally, in your development environment. Sure, you can try to enable this on staging or production, but there’s a very big chance your disk I/O won’t survive that setting. Be careful when doing this on anything but your local development environment.
I know some will #YOLO this in production, don’t @ me when your system breaks. 🙂
MySQL can log all queries that are being executed, with the ability to then fire off some CLI tools on that big query log to identify the most recurring queries.
First, similar to the Slow Query Log, create the file MySQL can write to:
$ touch /var/log/mysql-general-query.log
$ chown mysql:mysql /var/log/mysql-general-query.log
Next, instruct MySQL to log all queries to that file:
mysql> SET GLOBAL general_log_file="/var/log/mysql-general-query.log";
mysql> SET GLOBAL general_log = ON;
To disable the general log again:
mysql> SET GLOBAL general_log = OFF;
Now you can – again, locally – open your application, run your jobs & scheduled tasks, run your CI tests, … and every query will be logged to the /var/log/mysql-general-query.log file. The output will be something like this:
$ tail -f /var/log/mysql-general-query.log
2025-09-16T11:40:04.736814Z	   94 Prepare	select * from `plan_prices` where `archived` = ? and `is_yearly` = ? and `currency` = ? order by `amount` asc limit 1
2025-09-16T11:40:04.736987Z	   94 Execute	select * from `plan_prices` where `archived` = 0 and `is_yearly` = 0 and `currency` = 'eur' order by `amount` asc limit 1
2025-09-16T11:40:04.737575Z	   94 Close stmt
2025-09-16T11:40:04.745635Z	   94 Prepare	select * from `transformation_results` where `url` = ? and `type` = ? limit 1
2025-09-16T11:40:04.745773Z	   94 Execute	select * from `transformation_results` where `url` = 'https://ohdear.app.test/pricing' and `type` = 'ldJson' limit 1
2025-09-16T11:40:04.746173Z	   94 Close stmt
2025-09-16T11:40:04.768509Z	   94 Prepare	select * from `users` where `id` = ? limit 1
2025-09-16T11:40:04.768763Z	   94 Execute	select * from `users` where `id` = 27765 limit 1
2025-09-16T11:40:04.769149Z	   94 Close stmt
This quickly becomes overwhelming & you won’t be able to parse this manually anymore. That’s where the CLI comes in. Percona offers some amazing scripts for us to use, let’s install those first:
$ apt install percona-toolkit # for debian/ubuntu
$ brew install percona-toolkit # for Mac
The pt-query-digest tool allows us to analyse this general log and sort the queries by either count or time-spent in the database. We just need a quick fix in our log, because pt-query-digest only looks at the keyword Query in the log, and we’re using Prepared Statements so we have a lot of entries with Prepare and Execute that the tool will happily ignore. Since each Execute is just a Query that was executed, we can simply rename them in our logfile.
$ sed 's/Execute\t/Query\t/' /var/log/mysql-general-query.log > /var/log/mysql-general-query-editted.log
Then, let’s fire off the analysis:
$ pt-query-digest \
	--type=genlog \
	--group-by fingerprint \
	--order-by Query_time:cnt,Query_time:sum \
	--filter '$event->{cmd} =~ /^(Query|Execute)$/' \
	--limit 25 \
	/var/log/mysql-general-query-editted.log
The output is a bit noisy, but tells you which queries were executed most (Count attribute) and which spent most time (Exec time attribute). Any performance gain that can be made to the most-occuring queries will yield better results.
Improving a query from 25ms to 20ms may sound negligible, but if it’s performed millions of times a day, it adds up.
MySQL bonus 1: sort output vertically, not horizontally #
If you’re working via the CLI, some of the queries I shared above can have quite lengthy output that’s not always easy to see on small screens. You can change some of the outputs with modifiers in MySQL.
One very useful modifier is the \G control character – that’s backslash + G.
This is a normal query output via the CLI:
mysql> SELECT id, name FROM teams LIMIT 2;
+----+--------------+
| id | name         |
+----+--------------+
|  1 | Team Mattias |
|  2 | Spatie       |
+----+--------------+
2 rows in set (0.00 sec)
If you add in the \G suffix to a query, the results are shown vertically instead:
mysql> SELECT id, name FROM teams LIMIT 2 \G;
*************************  * 1. row ***************************
  id: 1
name: Team Mattias

*************************  * 2. row ***************************
  id: 2
name: Spatie
2 rows in set (0.00 sec)
That’s a litteral \G (backslash + G) at the end of the query.
MySQL bonus 2: write query output to a file #
If you miss using grep, awk, sort, … in a MySQL shell, you’re probably a greybeard Linux sysadmin and we should have some beers together. But good news, MySQLs’ output can be redirected to a file for easier parsing!
mysql> \T /tmp/query-output.log
Logging to file '/tmp/query-output.log'

mysql> SELECT * FROM teams;

mysql> \t
Outfile disabled.
With \T you can specify which file this MySQL session should write all its output to. And with \t you can stop writing to that file. Afterwards, your file contains all the output of the queries you ran in between.
You can also use INTO OUTFILE but I find it a little cumbersome to tweak queries to achieve that, I’d rather mark a terminal session as “log to file”, do the queries I want, and then stop that logging.
Let Laravel warn you for N+1 queries #
The Laravel framework can warn you when you’re (potentially) causing excessive queries by throwing an exception when you’re lazy loading relationships.
You can enable this warning in your non-production environment by adding the following into your boot() method in your AppServiceProvider:
public function boot(): void
{
    Model::preventLazyLoading(! $this->app->isProduction());
}
Now, every time you run a piece of code like this:
$posts = Post::all();

foreach ($posts as $post) {
    echo $post->comments->count();
}
It’ll throw an exception, because for every iteration through the loop, Laravel would perform an extra query to count the comments of that specific $post instead of loading them at once. The fix, in this example, would be to eager load the counts only – not all the comments.
// Eager load the comment counts
$posts = Post::withCount('comments')->get();

foreach ($posts as $post) {
    echo $post->comments_count; // Note the _count suffix
}
This is an example that will optimise your query count with just minimal code changes.
Next up: fixing the queries #
In this post, we shared several ways of identifying which queries either get executed the most or which are the slowest. There’s many ways to get this data, and you’re able to pick whichever method you’re most comfortable with or have access to.
In our next post, we’ll deep-dive into the different ways of identifying what the bottleneck of a query is and how to resolve it.
